I’ve been changing my own motorcycle tires for more than 20 years and one of the hard parts of the job has always been breaking the bead on the old tire — separating the tubeless tire from the wheel rim, for those who may not be familiar with the terminology. Recently, circumstances forced me to look for a new method for getting that part of the job done. That lead me to the BeadBuster tool and I used it for the first time this past weekend.
Here’s the short version of the review: This tool is simple, quick and easy to use and effective. For more the more detailed review, read on.
Breaking the bead: First step to changing your motorcycle tire
Over the 20 years I’ve been changing my motorcycle tires, the basic process of getting the old tire off and the new tire on the wheel has been about the same, using my favored set of tire irons, rim protectors and a jug of tire lubricant. But I’ve used a few different methods of accomplishing the pre-change process of breaking the bead.
My first setup consisted of a home-built table made of two-by-fours and a sheet of particleboard with a threaded rod through the center that I used to clamp down the tire so I could work on it. My bead breaker was a long two-by-four bolted to a stud in the garage wall with a short piece of free-swinging two-by-four hanging from it. I used the long board as a big lever and the small board pressed down on the tire to push it off the rim. It was crude, but it worked. (See my equally crude diagram.)

I made a homemade bead breaker using some two-by-fours bolted to a wall stud in the garage. Crude, but cheap and serviceable.
My second setup was an inexpensive tire changer from Harbor Freight (now discontinued). As a platform for working on the tire, it wasn’t really any better than my homemade table had been, but I appreciated it for the bead breaker. A long metal bar and a metal foot curved to match the arc of the tire allowed me to apply more force, more precisely and more securely, without the flexy slop of the two-by-four.
Then there are various other tools you can use for the job of breaking the bead. At the one-minute mark of this old Motorcyclist Magazine video by my current RevZilla colleague Ari Henning, he shows how the Motion Pro bead breaker tire irons work. As usual, it looks really easy when Ari does it, but then he can easily do about a million mechanical tasks that I can’t. Other tools available are the BikeMaster bead breaker, which is like a huge set of pliers, or stands like the BikeMaster tire change stand that have a built-in bead breaker. The one thing all of these have in common with my original homemade two-by-four solution is that they use a big lever to apply the force needed to pop the bead loose from the rim. The BeadBuster tool takes a different approach. And I needed a different approach.
After moving this year, I no longer have a personal garage work space at the moment. I still wanted to change the front tire on my Honda VFR800 Interceptor myself, however, both because of the fees most places charge for doing the job and the inconvenience of having to schedule the service. My sister offered the garage at her house as a work space and I had RevZilla ship my new tire direct to her door, but then I needed to take my tools over there to do the job. Carrying a big-ass lever in the VFR saddlebags was not an option. But the BeadBuster fits in my hand, so I decided to give it a try.
Instead of a lever, the BeadBuster applies pressure to the bead through a plunger driven by a big bolt. Another bolt clamps the tool to the rim and then you just turn the bolt and the “foot” of the tool presses down on the tire until the bead pops off. The video above shows the entire tire-changing process, including the use of the BeadBuster, on a side-by-side tire. Changing a motorcycle tire is the same process. See my article co-written with Lemmy at RevZilla if you’re new to this job and looking for some more tips.
To use the BeadBuster, all you need is a three-quarters-inch wrench or socket to drive the two bolts and some tire lubricant. Some people use some dishwashing soap diluted in water for lubricant, but the gallon jug of tire lubricant I bought several years ago costs about the same per ounce as soap and I still have half of it after more than a dozen tire changes, so I don’t see how anyone is going to save any significant money by using dish soap.

With some lubricant on the tire, slip the foot of the BeadBuster between the tire and the rim and tighten the clamp, which has a rubber cover to keep from scratching the rim.
Put a little lubricant on the tire sidewall, slip the foot of the BeadBuster under the rim and use the one bolt to tighten the clamp. Then turn the other bolt to press down the foot that pushes the bead off the rim. Though the demonstration in the video uses power tools, I only had regular hand tools available but it took little time and no serious effort to break the bead by turning the bolt by hand. Let’s hear it for mechanical advantage.
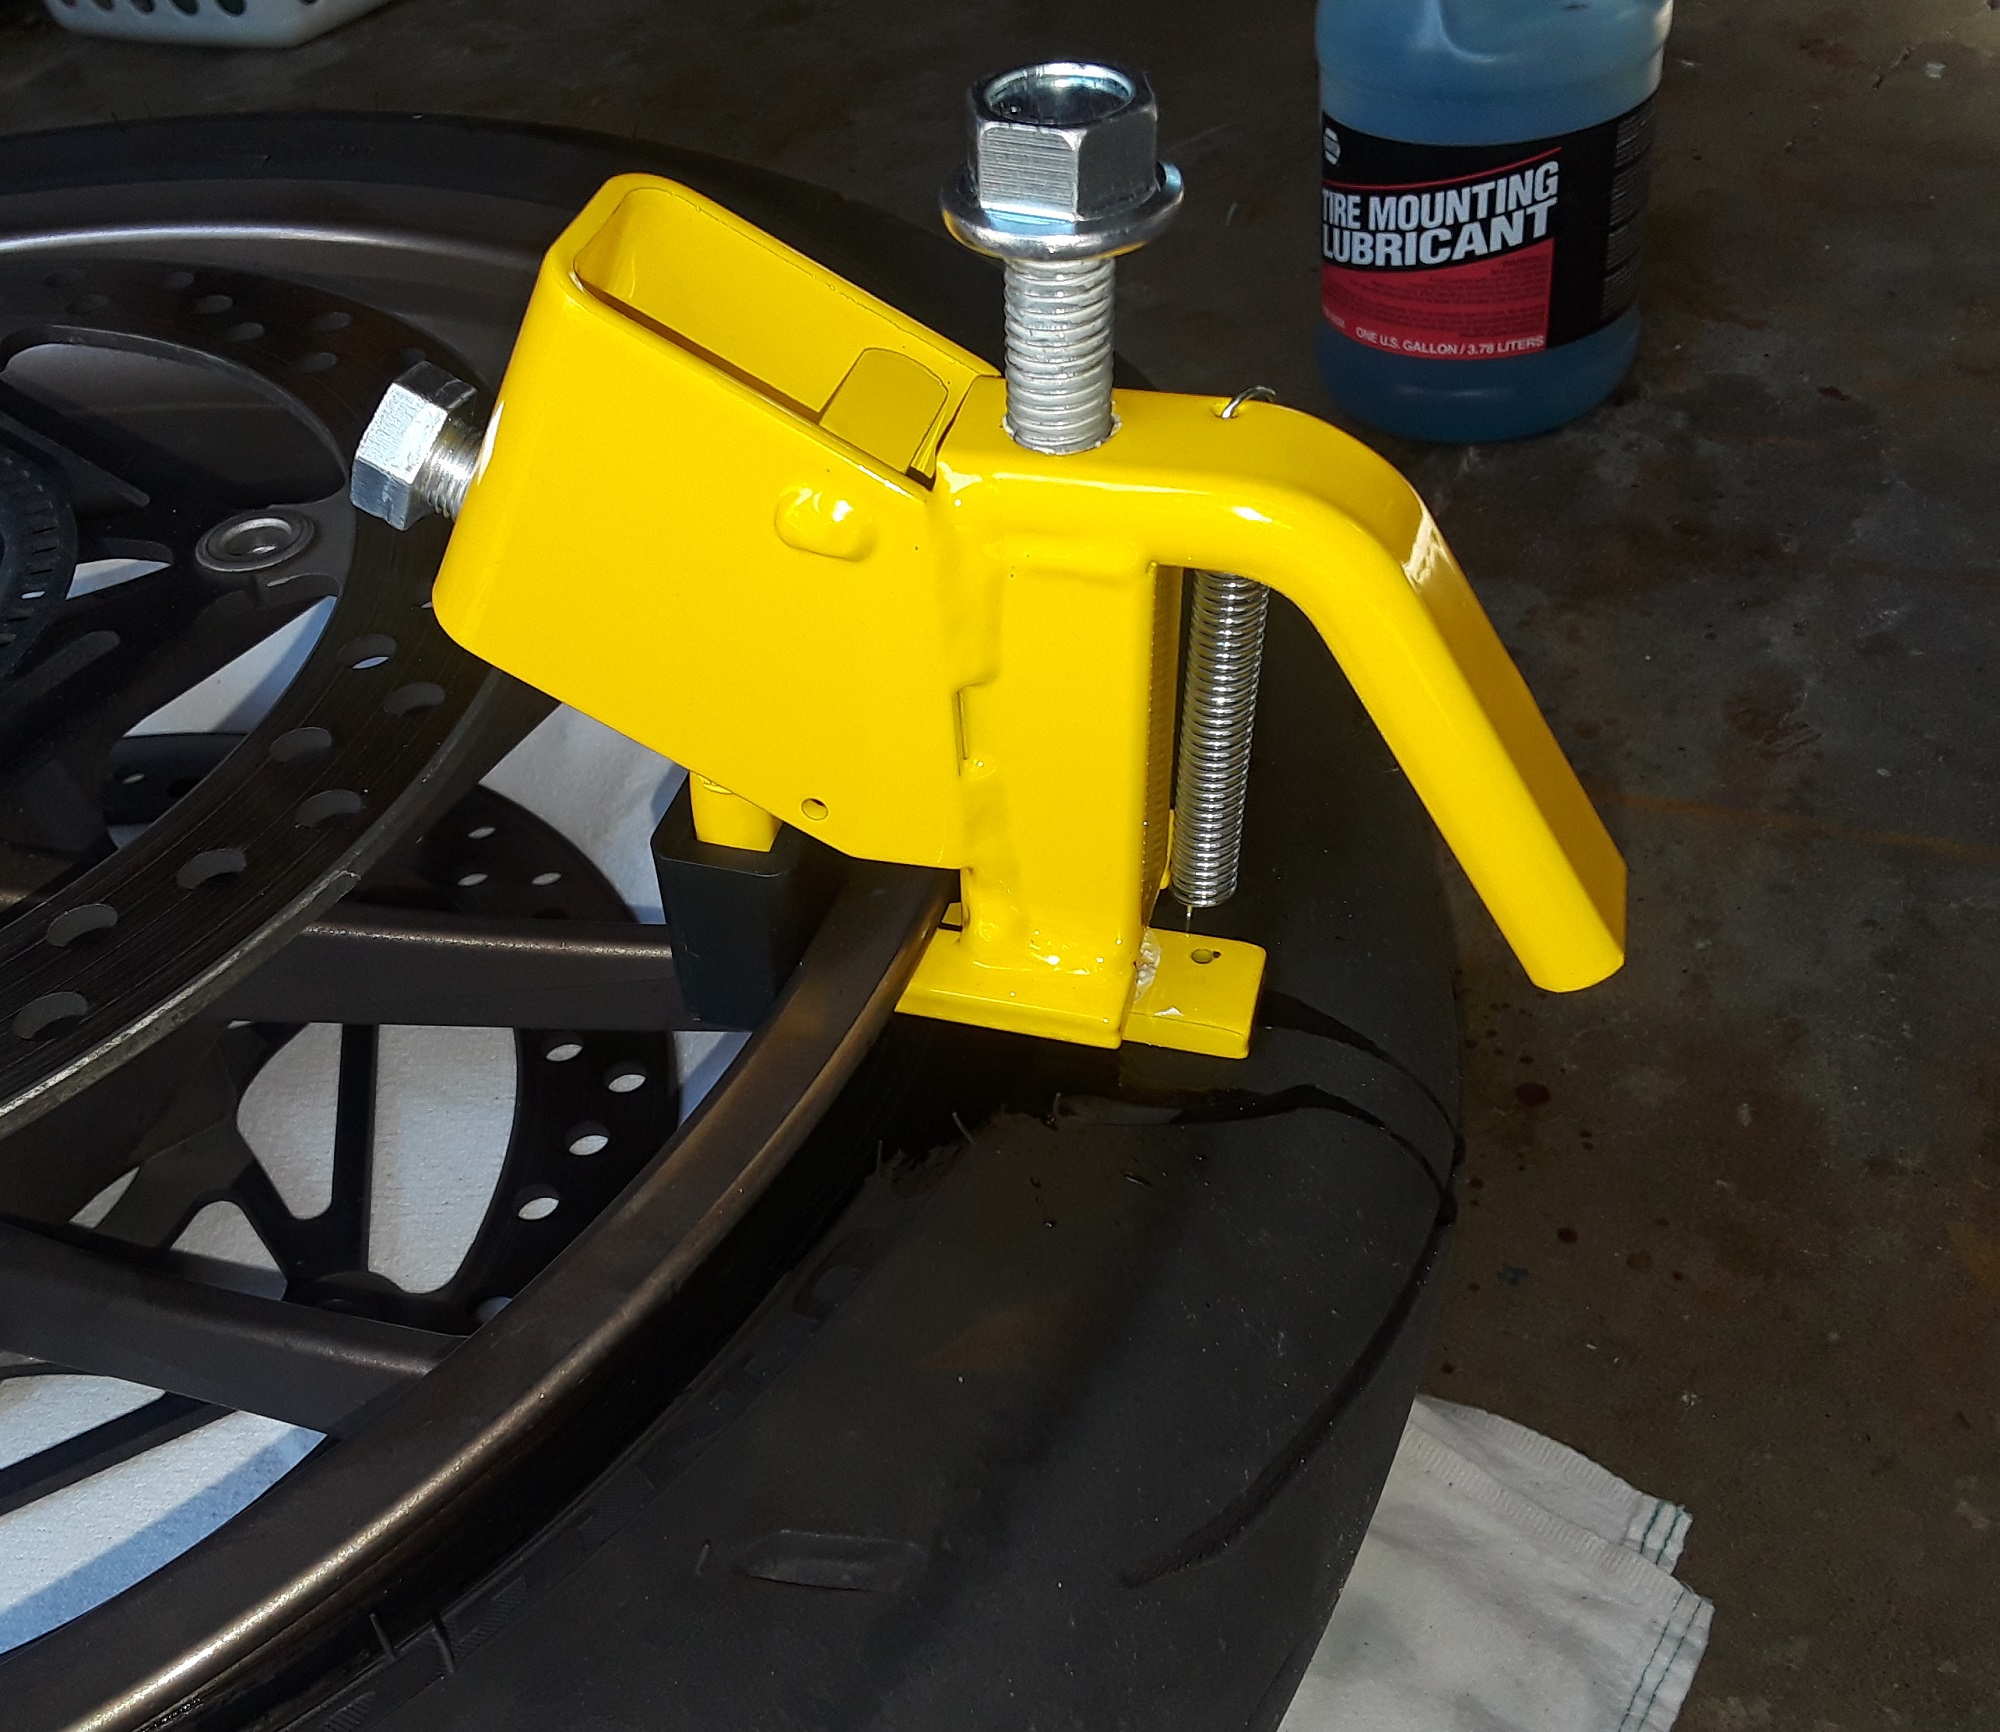
Tighten the top bolt and the foot presses into the tire sidewall, easily separating the tire from the rim. I only had to do this in one spot to separate the tire completely. On an older or more stubborn tire, you might have to reposition the tool and repeat the process.
I was working on a Dunlop Q3 front tire that was only a little over a year old, so that also made the job easier. Ancient tires can end up practically welded to the rim and can be hard to pry loose, but with just one application of the BeadBuster on each side, I was able to get the entire tire free from the rim without having to move the BeadBuster to a second location and use it again, as done with the larger tire in the video above.
Several sizes of BeadBusters are available but the smallest ones are appropriate for motorcycle tires: the XB-450 and XB-455. The difference between the two is that the XB-450, painted red, is made in the United States. The XB-455, painted yellow, is made in Taiwan. To my knowledge, they are identical except for place of manufacture and a slight difference in price. I bought the XB-455 from J&P Cycles, sister company to RevZilla, for $99.99. (I bought the tool with my own money and I don’t make a cent extra if you buy one, so this is an impartial review.) It’s a hefty and solid hunk of metal and feels overbuilt for the job.
Given the simplicity, sturdiness and portability of the BeadBuster, I don’t see any reason why I’d ever go back to using a long lever or similar tool to do the job of breaking the bead on my motorcycle tires. If you change your own motorcycle tires, I think the BeadBuster tool is the best way to go.
I have heard of people using the kickstand of one bike to break the bead on the tire especially if you have to do a repair on the road.
I have heard of that trick but haven’t seen it used, personally. It seems like it would be awkward.
In a pinch, I once put the tire and wheel on the ground underneath the trailer hitch of an SUV and put the car’s scissor jack between the hitch and the tire sidewall and cranked on it until it broke the bead loose. Sometimes you have to innovate.